


Splunk is an application that is designed to search and analyze data gathered from the machine, devices, and well anything that sends data in your infrastructure. Splunk takes this data and transforms it into a more human-readable format. For those that are tech-savvy, Splunk is a SIEM.
Splunk Cloud vs Splunk Enterprise
What’s the difference? Today we will be using Splunk Cloud but explaining the difference will be helpful. The big difference here is that Splunk Enterprise is hosted on your company’s infrastructure, or your personal machine if you are using it on your machine. Splunk Cloud is the same software however it is hosted in Splunk’s Cloud and all this hardware is maintained by Splunk. Splunk Cloud reduces the time it takes to get to production as well as decreases the cost of your SIEM.
Universal Forwarder
Universal Forwarders allow your machine to stream data to the receiver which is an index in Splunk Cloud. These forwarders allow use to monitor traffic in real time.
Purpose
The purpose of this article is to help show how to install Splunk cloud on an Amazon EC2 instance and set up a forwarder from a web server of another instance to our Splunk server.
Installing Splunk
To start head to Splunk
In the top right, you will need to create an account
Once you have an account and are logged in go to the Products tab and select Splunk Cloud Platform

Select Free Trail
Start Trial
This will send you an email that will include your login information and a URL to go to your Splunk Cloud.
Input your username and password generated for you, create a new password, and then you are now in your Splunk Cloud account!

Create a Splunk Index
Now we need to create a Splunk index, which I like to think of as a S3 bucket, this way we can send our logs later to this index. Make sure you are in the Splunk Cloud console.
Go to Settings
Indexes

Click New Index in the top right
Name it, add max data, and retention time
Save it

Create EC2 instance
Now head to your AWS account and create an Amazon Linux 2 EC2 instance with the following script inserted into the user data. Make sure to open your ports on 80/443 and 22.
#!/bin/bash
yum update -y
yum install -y httpd.x86_64
systemctl start httpd.service
systemctl enable httpd.service
echo “Welcome To The Cloud” > /var/www/html/index.html
Installing a Universal Forwarder
To send data from our webserver to our Splunk Cloud we need to install a Forwarder on our instance.
Choose Universal Forwarder on your Splunk Cloud homepage
Follow the 5 steps.
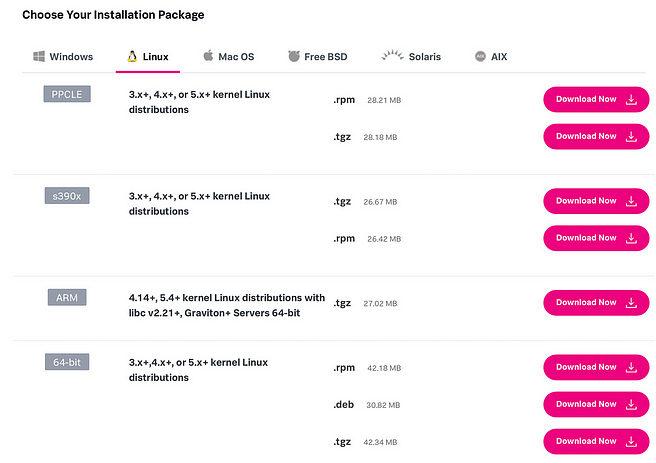
Step one downloads the Splunk universal forwarder.
This will redirect you to a page to download the file based on your distribution. We will choose the 64-bit .tgz package under Linux for our project
This will redirect you to a page, choose the “download via Command Line” to get a script. Copy this and we will put it into the CLI of our web server instance.
SSH into your Web Server and put this wget command in the CLI.
Then we need to untar this by
tar -zxvf splunkforwarder-9.0.1–82c987350fde-Linux-x86_64.tgz -C /optthe /opt will put this file in the /opt directoryNow with the Universal Forwarder installed on our EC2, we will choose the “Download Universal Forwarder Credentials” back on the Splunk Cloud page. This will download them to your local machine.

Click the installation instructions on step 4 and it will direct you to a page, you can follow, or follow the next steps
To copy the credentials package from your local machine to your EC2 instance use the following command
scp -I <key Pair> splunkclouduf.spl ec2-user@<EC2 DNS name>:~/splunkcloudf.spl
Then SSH back into your instance and copy the splunkcloud.spl files into /opt/splunkforwarder
cd into the /opt/splunkforwarder/bin/ folder and run the following to start Splunk
sudo ./splunk enable boot-start
sudo ./splunk start --accept-license
You will be prompted to create an admin and password
Run the following command
sudo ./splunk install app /opt/splunkforwarder/splunkcloudf.spl
sudo ./splunk restart
Now we need to add a monitor to our instance so that it will tell our machine where to send the data
sudo ./splunk add monitor /var/log
If you needed to remove a monitor, you use the following command
sudo ./splunk add monitor <path>
Let’s search for our logs. Return to the Splunk Cloud console and go to Search & Reporting app on the left. In the search bar, type in host=ip-<ip of instance> and you will see your data.

Conclusion
We have signed up for Splunk Cloud and accessed the Splunk Cloud Console. Created and EC2 and installed a universal forwarder on it to send data to our Splunk Cloud, finally, we searched for this data.