ArgoCD Simplified: A Practical Walkthrough for Easy Understanding

I am Bittu Sharma, a DevOps & AI Engineer with a keen interest in building intelligent, automated systems. My goal is to bridge the gap between software engineering and data science, ensuring scalable deployments and efficient model operations in production.! 𝗟𝗲𝘁'𝘀 𝗖𝗼𝗻𝗻𝗲𝗰𝘁 I would love the opportunity to connect and contribute. Feel free to DM me on LinkedIn itself or reach out to me at bittush9534@gmail.com. I look forward to connecting and networking with people in this exciting Tech World.
What is Argo CD
Argo CD is a Kubernetes-native continuous deployment (CD) tool. Unlike external CD tools that only enable push-based deployments, Argo CD can pull updated code from Git repositories and deploy it directly to Kubernetes resources.
argoCD
What is GitOps?
GitOps is a way of implementing Continuous Deployment for cloud-native applications. It focuses on a developer-centric experience when operating infrastructure, by using tools developers are already familiar with, including Git and Continuous Deployment tools.
The core idea of GitOps is to have a Git repository that always contains declarative descriptions of the infrastructure currently desired in the production environment and an automated process to make the production environment match the described state in the repository. If you want to deploy a new application or update an existing one, you only need to update the repository — the automated process handles everything else. It’s like having cruise control for managing your applications in production.
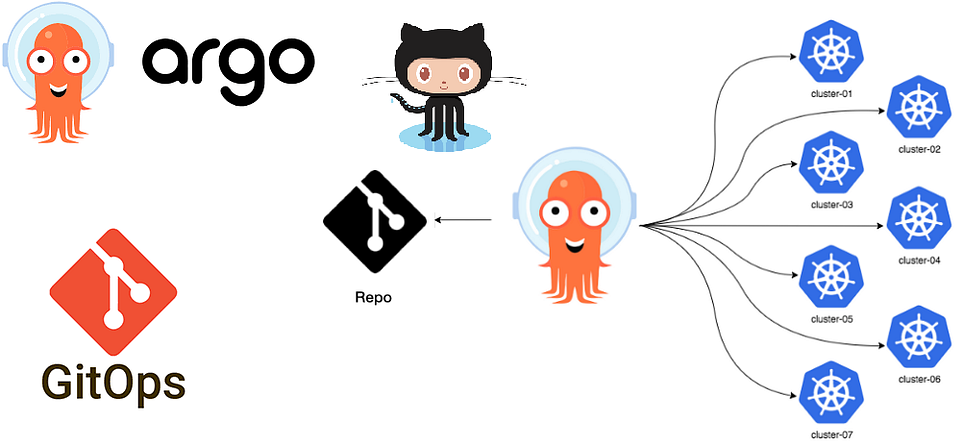
How to achieve GitOps using Argo CD?
Every enterprise uses Git as its source code management software to store code. Developers can commit their infrastructure configurations, such as Kubernetes resources definition, in Git to create environments needed for application deployment.
Once a developer implements a feature ( with a new application and K8S configurations) and merges with the main branch, the CI process is initiated for generating and testing an image.
After the review and approval of the application, the pull request in Git is merged with the main branch. With the help of the GitOps agent, Argo CD will immediately identify the new versions of a configuration that was recently merged and compare it with the running application in the destination environment (it can be pre-prod or prod).
In case of a mismatch, it highlights out-of-sync status, and in the backend, Argo CD uses the Kubernetes controller to reconcile the new changes to cluster resources. Once the Kubernetes resources are ready, it informs the user the application is in sync.
Argo CD also uses an agent to constantly monitor the end environment and check its status with Git. Argo CD synchronizes the current state with the declared state of configurations and ensures that new configurations are correctly deployed to a Kubernetes cluster.
As all the records of all changes, including all details of the environment, at every stage of the process are stored in Git, Argo CD helps roll back applications to previous states in a single click.
Benefits of Argo CD:
- Improve developer productivity
Argo CD provides developers with a self-service environment for application deployment. Software development teams can focus on creativity and writing business logic instead of time and energy on manual and remedial deployments.
2. Improved software delivery compliance
Allow your developers, Ops, and DevOps teams to use a single platform for infrastructure change management. Apply organizational policies to restrict access to Kubernetes resources and minimize your application downtime and outages.
3. Increased collaboration in SDLC
While working on Argo CD, every team member can work from the same system to achieve GitOps and understand the status of individual processes. The single Git repository fosters collaboration amongst team members by assigning tasks to individuals and deploying code from each person as necessary.
4. Faster deployments
Argo CD allows teams to perform more rapid deployments into Kubernetes clusters across multi-cloud. Quicker releases of application changes mean shorter time to market and more flexibility in responding to customer demand.
Prerequisites:
- A running Kubernetes cluster
How to install ArgoCD?
For this tutorial, you must have a running Kubernetes cluster like I have minikube running on my server.
Create the namespace for Argo CD
kubectl create namespace argocd
- Install Argo CD using the below command
kubectl apply -n argocd -f https://raw.githubusercontent.com/argoproj/argo-cd/stable/manifests/install.yaml
- After installing the Argo CD, you can run the below command to check what resources it has created.
ubuntu@ip-172-31-7-106:~$ kubectl get all -n argocd
NAME                                                    READY   STATUS    RESTARTS   AGE
pod/argocd-application-controller-0                     1/1     Running   0          106m
pod/argocd-applicationset-controller-787bfd9669-4mxq6   1/1     Running   0          106m
pod/argocd-dex-server-bb76f899c-slg7k                   1/1     Running   0          106m
pod/argocd-notifications-controller-5557f7bb5b-84cjr    1/1     Running   0          106m
pod/argocd-redis-b5d6bf5f5-482qq                        1/1     Running   0          106m
pod/argocd-repo-server-56998dcf9c-c75wk                 1/1     Running   0          106m
pod/argocd-server-5985b6cf6f-zzgx8                      1/1     Running   0          106m
NAME                                              TYPE        CLUSTER-IP       EXTERNAL-IP   PORT(S)                      AGE
service/argocd-applicationset-controller          ClusterIP   10.102.163.101   <none>        7000/TCP,8080/TCP            106m
service/argocd-dex-server                         ClusterIP   10.101.227.215   <none>        5556/TCP,5557/TCP,5558/TCP   106m
service/argocd-metrics                            ClusterIP   10.111.59.189    <none>        8082/TCP                     106m
service/argocd-notifications-controller-metrics   ClusterIP   10.96.102.185    <none>        9001/TCP                     106m
service/argocd-redis                              ClusterIP   10.97.229.117    <none>        6379/TCP                     106m
service/argocd-repo-server                        ClusterIP   10.102.16.58     <none>        8081/TCP,8084/TCP            106m
service/argocd-server                             ClusterIP   10.98.71.135     <none>        80/TCP,443/TCP               106m
service/argocd-server-metrics                     ClusterIP   10.109.248.207   <none>        8083/TCP                     106mNAME                                               READY   UP-TO-DATE   AVAILABLE   AGE
deployment.apps/argocd-applicationset-controller   1/1     1            1           106m
deployment.apps/argocd-dex-server                  1/1     1            1           106m
deployment.apps/argocd-notifications-controller    1/1     1            1           106m
deployment.apps/argocd-redis                       1/1     1            1           106m
deployment.apps/argocd-repo-server                 1/1     1            1           106m
deployment.apps/argocd-server                      1/1     1            1           106mNAME                                                          DESIRED   CURRENT   READY   AGE
replicaset.apps/argocd-applicationset-controller-787bfd9669   1         1         1       106m
replicaset.apps/argocd-dex-server-bb76f899c                   1         1         1       106m
replicaset.apps/argocd-notifications-controller-5557f7bb5b    1         1         1       106m
replicaset.apps/argocd-redis-b5d6bf5f5                        1         1         1       106m
replicaset.apps/argocd-repo-server-56998dcf9c                 1         1         1       106m
replicaset.apps/argocd-server-5985b6cf6f                      1         1         1       106mNAME                                             READY   AGE
statefulset.apps/argocd-application-controller   1/1     106m
ubuntu@ip-172-31-7-106:~$
- Now in order to access the UI of ArgoCD, you need to run the below command
kubectl edit svc argocd-server -n argocd #enable Node Port
Now, in order to log into the UI you need the credentials. So, for a username, you can write
adminand the password is stored in the secret calledargocd-initial-admin-secretin the cluster.You need to run the below command to get the value of the secret.
kubectl get secret argocd-initial-admin-secret -n argocd -o yaml
- The secret base64 encoded so, you have to decode the secret by running the below command.
echo "secret value" | base64 --decode
After running the above command you can have the decoded value of the secret and using that as a password you can log in to the UI.
Now, the installation has been completed.
Now, the installation is completed.
So, now I have an application running on my Kubernetes cluster. Below are the manifest files for that.
- Deployment file
apiVersion: apps/v1
kind: Deployment
metadata:
  name: swiggy-app
  labels:
    app: swiggy-app
spec:
  replicas: 3
  selector:
    matchLabels:
      app: swiggy-app
  template:
    metadata:
      labels:
        app: swiggy-app
    spec:
      terminationGracePeriodSeconds: 30
      containers:
      - name: swiggy-app
        image: veeranarni/hotstar:latest
        imagePullPolicy: "Always"
        ports:
        - containerPort: 3000
2. Service file
apiVersion: v1
kind: Service
metadata:
  name: swiggy-app
  labels:
    app: swiggy-app
spec:
  type: LoadBalancer
  ports:
  - port: 80
    targetPort: 3000
  selector:
    app: swiggy-app

Repository
So, now in order for argoCD to sync with this repository we need to write some manifest file for that. Here is the manifest file for that.
apiVersion: argoproj.io/v1alpha1
kind: Application
metadata:
  name: myapp-argo-application
  namespace: argocd
spec:
  project: default

  source:
    repoURL: https://github.com/bittush8789/Kubernetes-main.git
    targetRevision: HEAD
    path: day-12-argocd
  destination:
    server: https://kubernetes.default.svc
    namespace: myapp

  syncPolicy:
    syncOptions:
    - CreateNamespace=true

    automated:
      selfHeal: true
      prune: true
argoproj.io/v1alpha1is an API version of argoCD. The API Version might get changed once argoCD has some new release. Always refer to the documentation for the latest information.I am defining my repository URL in
repoURLsection.targetRevisionis set to HEAD so that it will always fetch the latest commit.pathis set to ‘day-14-argocd’ because I have my application’s manifest files in ‘day-14-argocd’ folder.In the
destinationsection we haveserversection and it is set tohttps://kubernetes.default.svcwhich is the internal service of the kubernetes API Server.
ubuntu@ip-172-31-7-106:~$ kubectl get svc
NAME         TYPE        CLUSTER-IP   EXTERNAL-IP   PORT(S)   AGE
kubernetes   ClusterIP   10.96.0.1    <none>        443/TCP   137m
ubuntu@ip-172-31-7-106:~$
namespaceis set tomyapp, because we want to create our application in that namespace. Now, we actually don’t have the namespace already created because we want argoCD to create that automatically.In order for argoCD to create the namespace automatically we need to define the below attributes.
syncPolicy:
    syncOptions:
    - CreateNamespace=true
- We want argoCD to automatically sync any changes in the git repository but by default, it is turned off. So in order to enable that we need to define the below attributes.
automated:
  selfHeal: true
  prune: true
If you apply any changes from the backend using
kubectlutility then we want to override that with whatever we have in our git repository in order to do that we haveselfHeal: truefor that.If we rename any component or delete the entire component then we want argoCD to delete that component in the cluster as well and in order to do that we have
prune: truefor that.argoCD will check the changes in the git repository every 3 minutes. If you want argoCD to check the changes as soon as it has done then you can implement the webhook for that.
Now, that we have our file ready we need to run the below command to apply that.
kubectl apply -f application.yaml
- Once you apply the file you can check your application in the UI.
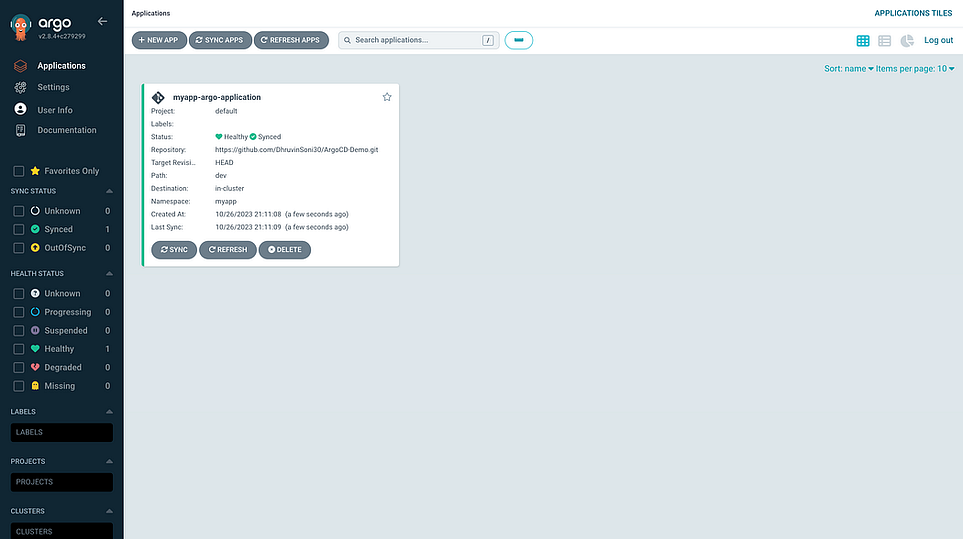
Application
- You can click on your application and check the various details.
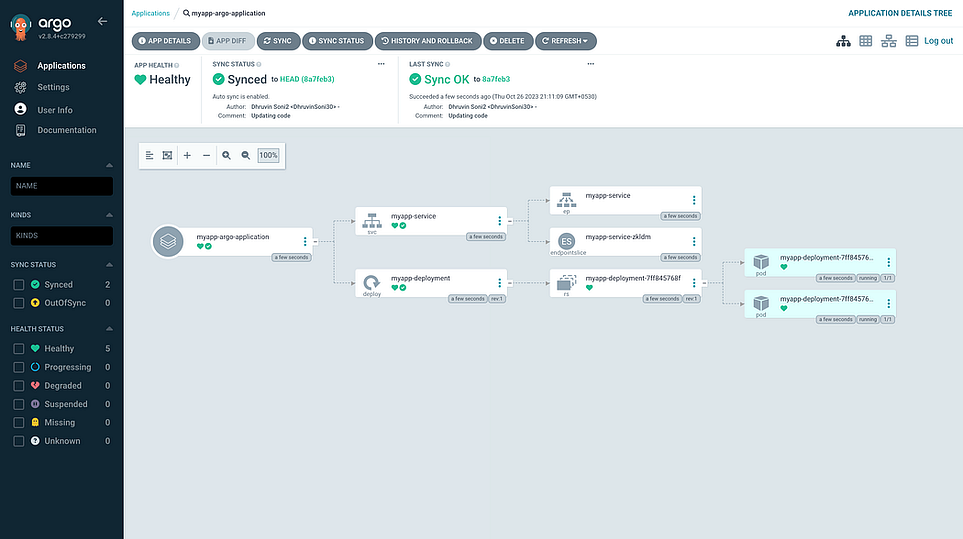
Workflow
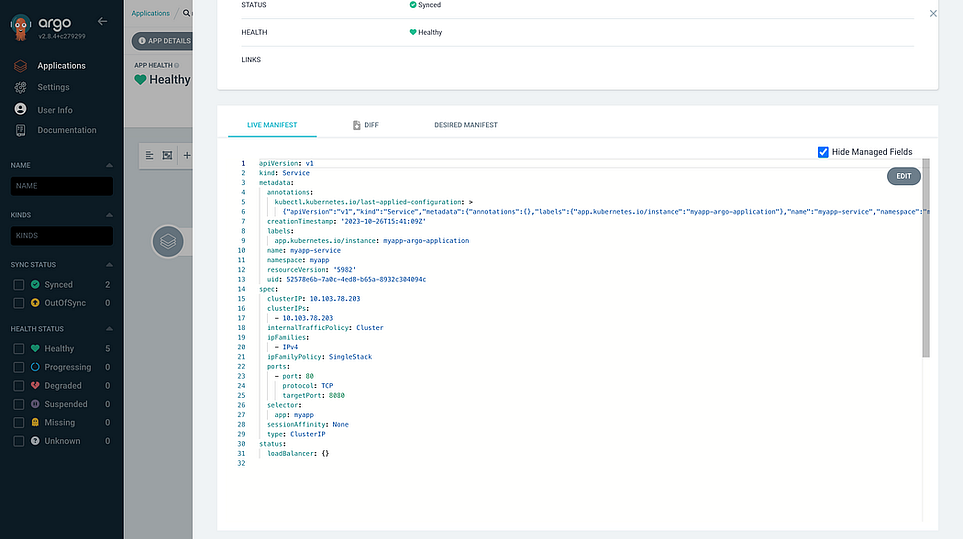
Manifest file
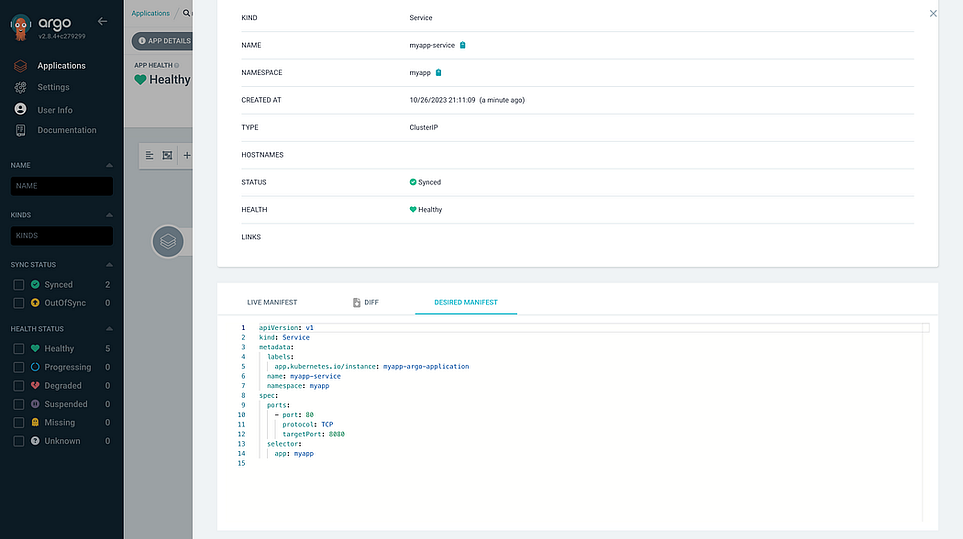
Manifest file
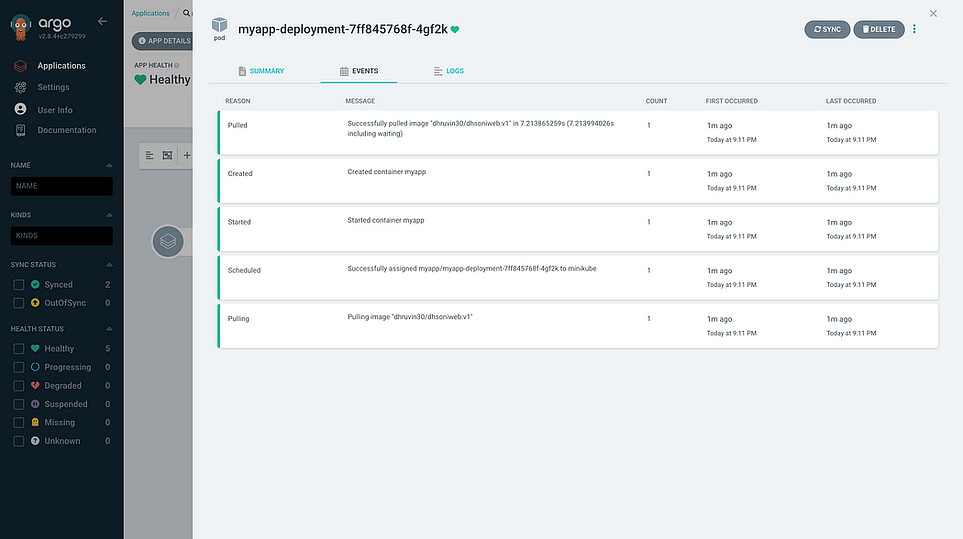
Events of pod creation
- Now let’s say you want to increase the replica for your application. You just need to commit your changes in the git repository deployment.yml
Changes
- As soon as you commit the changes in the repository, argoCD will look for the changes and apply the changes in the cluster.
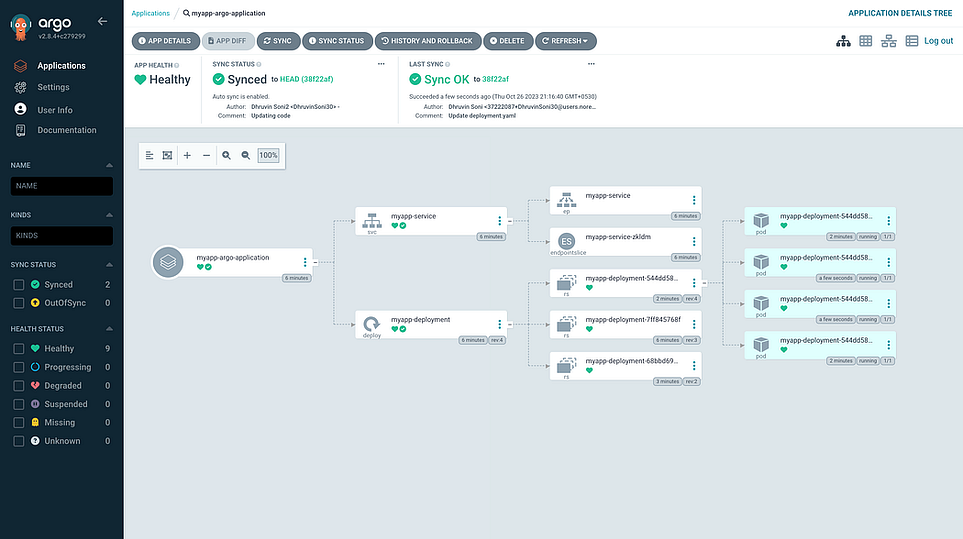
Changes in cluster
- As you can see, now we have a total of 4 pods in the cluster.
ubuntu@ip-172-31-7-106:~$ kubectl get pods -n myapp
NAME                                READY   STATUS    RESTARTS   AGE
myapp-deployment-544dd58bc4-4sntz   1/1     Running   0          13h
myapp-deployment-544dd58bc4-wkf5j   1/1     Running   0          13h
myapp-deployment-544dd58bc4-xt7hb   1/1     Running   0          13h
myapp-deployment-544dd58bc4-zjmn8   1/1     Running   0          13h
ubuntu@ip-172-31-7-106:~$
- Now you can perform different changes as per your need and Argo CD will take care of the further action.


